Roominations

Monday, May 31, 2010

More @#$#%&* firewood

Phase I — August 2008: Collect underpants

My design approach for Casa de Roo seems to be following the philosophy of the “Underpants Gnomes” in South Park.

Their business plan:
Phase I: Collect underpants
Phase II: ???
Phase III: Profit!

For example, in July 2008, I insisted the crew save the pine pole that had helped support the house because I planned to use it, “somehow.” (And I did! In 2010. See, “Downstairs transformation: @#$#%&* firewood.”)

After spending time with the chickens and other critters at the New Jersey State Fair in Sussex County on August 3, 2008, I saw the Wood Mizer booth. In it was not only equipment to turn trees into plainsawn lumber, but the lumber itself—boards that still retained the look of the tree from which they came.

Matt tried to distract me with a yummy lobster roll. Sated, I scurried into the booth to ask the nice man about the luxurious lumber.

For sale?
Yes.
How much?
Fifty bucks. For black walnut.

I went over to the board that first caught my eye. It was an inch-and-a-half thick, 70 inches long and 21 inches wide. Sold!

And Matt was not happy!

In my myopia, I only saw beautiful wood. And I wanted it.

Matt saw only the challenge of getting said slab of wood into his truck at noon, just as traffic was backing up for miles. To avoid getting stuck for hours, we went the wrong way down a one-way street, cut across a restricted parking area, squeezed between parked cars and splashed through mud.

The board fit perfectly into the back of the truck and off we went. It was a quiet ride. And a teary, mediocre lunch that cost about what I paid for the wood.

Not only were we already living in home renovation chaos, I had just introduced another piece of very large clutter. And unlike the front door that was in the guest bedroom with its sidelight in the master bedroom, and the hot tub on the driveway with the its heater in the storage unit, this item has no predetermined purpose, no raison d’être

And I’d already screwed it up.

The Wood Mizer guy was very clear: Seal the edges with wax or the wood will crack because the exposed ends will dry faster than the middle. Instead, I dabbed Old English Lemon Oil on the edges, ignoring the fact that the label failed to contain the word “wax.” Within a week, the wood cracked.

Master Bedroom, August 4, 2008: Nice piece of wood!

Living Room, Behind Couch, August 9, 2008:
Small cracks become larger, since I failed
to properly treat the ends of the slab.

Into the utility room I went on August 9, unstacking, opening and rifling through boxes until I found the Howard Feed-n-Wax wood preserver and liberally painted it onto the ends and into the growing cracks. On August 17, I flipped the board to seal the cracks on the other side. I then set the slab aside to cure for the recommended two-plus months. (Or so I thought.)

Phase II — August 2008–May 2010: ???

What has the slab of wood been since we brought it home? In the way.

August 2008: Under the futon in the guest bedroom.
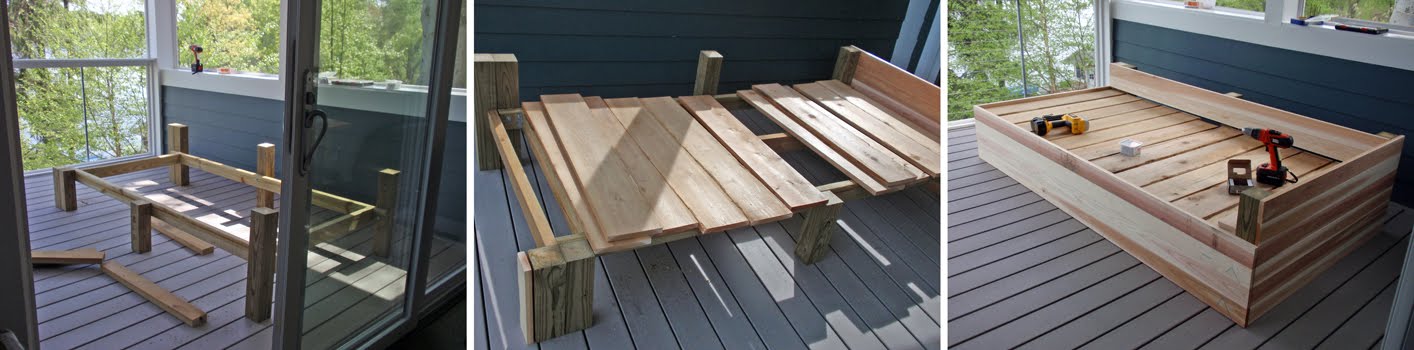
March 2009: In the evolving screen porch.
From there we moved the slab into the front
shed, where it resided until May 2010.

Phase III —May 16–29, 2010: Profit!

At last: It was time to turn the American black walnut slab into a table.

On Sunday, May 16, 2010, we placed the freeform
slab in front of our house. And thus the project began.

In my mind’s eye was the work of legendary woodworker George Nakashima (and also his daughter, Mira).

Matt gets the project started off right with his
understanding of geometry and trusty cordless circular saw.

Luckily, Matt knew just what to do. First, he determined how much of the damaged wood needed to go. Then, he squared off the table—no easy feat given its natural flitch edge. The wood was now 66 inches long, 19.5 inches at the widest end, 17 inches in the middle and 14 inches at the narrow end.

Now it was my turn. I got out my orbital sander and first removed the remaining bark. My 80-grit sandpaper was no match for this hardwood, necessitating a trip to Home Depot for 40 and 60 grit disks.

A cracked area kept catching and dislocating the
sanding disks, so I filled it with wood putty.
Days later, we disguised the patch with walnut stain.

In all, I spent an estimated four hours sanding before it was time to apply the same tung oil finish we used on the daybed in the porch.

With its wax and oil mix, the finish was fairly simple to apply and keep applying until the wood seemed saturated.

May 22, 2010: A quick look from the deck down at the
in-progress tabletop before I go to screw up the finish.

My plan on May 22 was to coat the flip side of the slab in tung oil. But I did not wait long enough for the finish to dry, let alone cure, before I flipped the wood over again. And I did not consider the oily wax would seep onto what would be the top of the table.

Sanding the top created a mud comprised of sawdust, wax, oil, small insects and plant matter provided by the windy backyard. I had pretty much ruined the finish. It took two-plus hours of rubbing and sanding to remove the mess. This was not an enjoyable process and my stress level was not low.

Matt had not been happy with the waxy look of the table anyway, and used this setback as an opportunity to upgrade the project to a high-gloss tung oil finish. Then I was not happy, because the wax-free oil was much harder to work with and took me three coats to figure out.

After work on Tuesday, May 25, 2010, I applied another
coat of high-gloss tung oil, working in the backyard shed.
The beauty of the wood was starting to shine through.

The end result was beautiful. Like usual, Matt was right.

Last step: Legs. We considered various options, and I even thought large wheels would be kinda cool. But nothing seemed right. Then I had an “ah-ah” moment and grabbed the spring edition of Atomic Ranch off my nightstand. I pointed at the ad for hairpin legs. “That is it,” we agreed!

The legs from the aptly named Hairpinlegs.com,
made in Hilliard, Ohio, arrived on May 26, 2010.

May 28, 2010: Matt adds a mending plate to the underside
of the table to prevent futher cracking. Then he figures out
how to place the legs so the free-form table looks balanced.

We attach the legs on Friday, May 28, in honor of the 16th anniversary of the blind date that turned us instantly into a couple. And then I applied the final coat of tung oil.

We selected the sturdy three-rod hairpin legs
with the brushed stainless steel finish.

Just in time for very first party in the porch, we move the table into place in front of the daybed we made and prepare to greet Tiffiny and Jerry at our door.


Labels: ,

Sunday, May 16, 2010

Like being in a tree house

A goal for renovating Casa de Roo has been to get daily moments of, “it feels like we are on vacation!” One feature in particular has required quite a bit of tweaking to provide opportunities for chllin’ out. Amazing how much work it has taken to turn the screen porch into a place where we can relax (and we have a few more steps to go).

Before: A view of our structurally unsound deck
from our neighbor’s deck on June 14, 2008.

After: View of the screen porch from the same
vantage point on July 5, 2009. The peak over the
porch balances the peak over the front door.

On April 24, we took the screen porch apart again. In March 2009, we removed view-blocking support posts that had been in the architectural drawing, but were structurally unnecessary.

Screen porch on March 8 (left) and March 28, 2009.

Screen porch parts on April 24, 2010.

This time, it was to rip out perfectly installed quarter-round pine trim from around the screens because it began turning black. After removing the screens, we cleaned, repainted the existing white trim and then put the screens back in, this time using PVC trim from Lowe’s.

We added a Cocktail Ledge, also made from white PVC.

After giving the room a good scrubbing to remove layers of yellow tree pollen, it was time to build the daybed Matt and I considered a “must have” since a December 2007 trip to the Bahamas.

Lounging around in our bungalow on Andros Island.

We had discussed the design many times since and determined it should be clad in cedar, to match our privacy walls, hot tub and deck skirting.

The daybed project takes shape on May 1, 2010.


As seems to be the case with all our projects, building the daybed took longer, featured some rework and required more materials than we expected. For example, we didn’t have quite enough cedar. Luckily, we had some wide-plank slag rejects from our deck skirting-with-barn-door project, which we used for cushion slats.

To get the rest of the materials needed to complete the build on May 2, we made a post-Saturday-night-out run to both Home Depot and Lowe’s. Other steps included long sessions of sanding, as the clear cedar boards we had ordered specifically for the project were slag, too. Dirty. Gouged. Strap-marked. Written upon. Then we topped the back and arm rest with the same PVC used for the Cocktail Ledge we added to the front of the screen porch.

At last, it was time for the finishing touches. First in place are the luxurious parrot green custom cushions that arrived on April 13 from OutdoorFabrics.com, topped by five outdoor pillows featuring sea life images by Thomas Paul that we purchased from Semplice Home in Montclair. (An ad in NJ My Way reminded me about the store I’d enjoyed way back in our Bloomfield days, and a lovely e-mail exchange with co-owner Kelly made me believe it was worth the April 11 trip.)

The daybed structure is complete on May 2, 2010.

On May 5, we moved all those cushions back inside so I could apply the first layer of tung oil. “No problem,” I assured Matt over coffee, “I can get this done before we need to pick up David at 10 a.m. and head to Philadelphia for the communicator’s conference.” Yeah, right: No problem. It was a turbo-driven tung oil application session.

A second tung oil session started before 7 a.m.
on Friday, May 7, 2010, a so-called “vacation day.”

That Friday, I applied two more coats, keeping my eye on the clock: we needed at least 16 hours of curing time before we could set the bed back up so it looked nice for our guests on May 8. Whew! The wood was dry just before Jean and Jennifer arrived with other family members and respective girlfriends for the combo Mother’s Day / Birthday party we were hosting last Saturday.

Finally, after work on May 13, I got to lounge on the fruits of our labor. Matt was playing softball, so I grabbed a magazine and plunked myself down on the daybed at dusk. Birds of many feathers were chirping all around me; it felt like relaxing in a tree house.

At 8:07 p.m. on Thursday, May 13, 2010.

Yesterday, I gave the tung oil finish a quick buffing with my new power tool, to smooth out a few lingering drips. Time at last for an easy project: installing outdoor FLOR® carpet tiles by Interface.

I’d wanted to use this environmentally responsible company’s carpet since the first time I heard their founder speak in September 2006. I saw another Ray Anderson presentation in September 2009, and even got him to autograph his book.

OK, OK… eco-cred aside, we choose this product because it ended up presenting the best design solution we could find. What a joy the carpet tiles are to work with—and so soft under my bare feet!

My goal for this week is to spend some time lolling around in the screen porch.

Labels: , ,

Sunday, May 09, 2010

Downstairs transformation: @#$#%&* firewood

On July 28, 2008, when structural repairs to our home began, I wrote:


As I requested, the team saved the pine tree that had helped hold up the house—it had been set directly in the dirt and surrounded by concrete. Matt calls the reclaimed lumber “@#$#%&* firewood.” He is not the only one swearing: I pledge to somehow use this pole in the renovation! (Hmmm… I wonder how…)

It wasn’t the first time a group of men had looked at me as though I was crazy, but figured they wouldn’t experience my full crazy potential by simply doing as asked. In fact, I made them save every one of the five poles they replaced with structurally sound lally columns.

The largest of the pine poles supporting the house, as seen
on May 7, 2002. We had attempted to make this area an
office for me, but it was too cold, dreary and damp.

The same pole in March 2006, after Matt
and I had demolition well underway.

A view from the utility room into the downstairs area.
Note the concrete-filled steel lally columns
replacing the end-rotted pine poles.

And so, the poles waited in the shed
(with the largest on the kayak stand)
from 2006-2010 for their moment to be
reunited with the home they once supported.

In the meantime, Steve Wasko's team (hired in May 2008)
made structural improvements to the house,
including installing these two lally
columns, which I
painted silver. A crew then insulated the downstairs;
in December 2008, a worker installed drywall.

Matt and I then painted, had railings
installed
, tiled and finished the stairs.

In July 2009, Matt installed our Blomus wall-hung
stainless steel fireplace, which uses clean-burning
ethanol fuel. By December, we were making good use
of the room, thanks to our Nintendo Wii Sports Resort.
Last night, eight of us held a bowling tournament.

At last, it was time to do something with the “@#$#%&* firewood.”

We set up the circular saw on April 3 and started
cutting the poles into inch-thick rounds. Each cut
required flipping the log to get the blade all the way through.

Concerned we didn’t have enough rounds,
we headed into the utility room to pull out
the last remaining wood pole. It was
incredibly easy, given that a multitude
of genuine lally columns now supported the
weight of the house once supported by the pole.

Score: It was cedar, a nice accent to the pine poles. So, we cut
it up, too, which took the rest of the day. Neighbors on both
sides of our house wondered what the heck we were up to.


The next day, I rough-sanded each round,
knocked out dead worms and pulled out
spider eggs (and in some cases, live spiders).
To bring out their character, I coated the best
side of each of the 310 rounds with Universal Sealer.

The worm holes, cracks and rings popped.
This took several sessions of effort starting
on April 10, not just because of exhaustion
but due to the lack of room to spread out the
rounds so they could dry while re-acclimating
to their indoor environment.

We did actually use the scrap pieces for “@#$#%&*
firewood” in our upstairs fireplace
on several chilly spring days (including today).

While I slept in until 7 a.m. on April 24, Matt made the
curved wall charcoal with leftover paint from a closet
project of years ago. The next day, we undertook installation
and realized we had enough rounds to fill the entire wall.

The project required eight or so tubes of Loctite PowerGrab.

Our time-sensitive goal was to complete the wall by May 8 to add a cozy touch to the hotel suite for Jennifer’s visit from Minnesota. The design goal was to preserve some of the home’s original history in an interesting way.

Labels: ,